Optimizing The Frog System For Rescue: Rescuers’ Perspectives

The Frog system is the most common ascending system used by cavers worldwide. It is compact, efficient, and lightweight. The Frog system offers customization for the user’s physical differences and the vertical geological obstacles they may encounter. As active cavers and teachers of small party rescue we’ve seen many variations of the Frog system and how minor adjustments can yield major improvements for the climber. We want to offer our perspectives on how to configure and tune the Frog system to maximize climbing efficiency and be well-prepared in the event you need to assist a companion in the vertical environment.
As Americans, we find that we all have minor differences in our climbing systems. We don’t tend to use identical Frog systems like many Europeans do. Standardization within a team, club, or project can offer many safety and efficiency benefits, but can lead to the mindset that there is only one “right way” to do things. An innovation mindset is important to facilitate progress and to take advantage of new types of gear. Remaining open-minded allows the user to gain knowledge while trying techniques that others have adapted. It comes with a caution that not every combination or configuration of gear works well together, especially when considering rescue techniques. From our perspective, it’s fine to have different components in your vertical system compared to someone else on your team, as long as you understand why the choice was made. We encourage you to ask yourself and your teammates, “Why?” Have you tried variations that lead to a different set-up or do you use your original ascending configuration? Have you tried changing things up to learn what works best for you? With that in mind, we’d like to offer suggestions on how to optimize your Frog system for rescue. Let’s identify the components first, then how best to configure them.
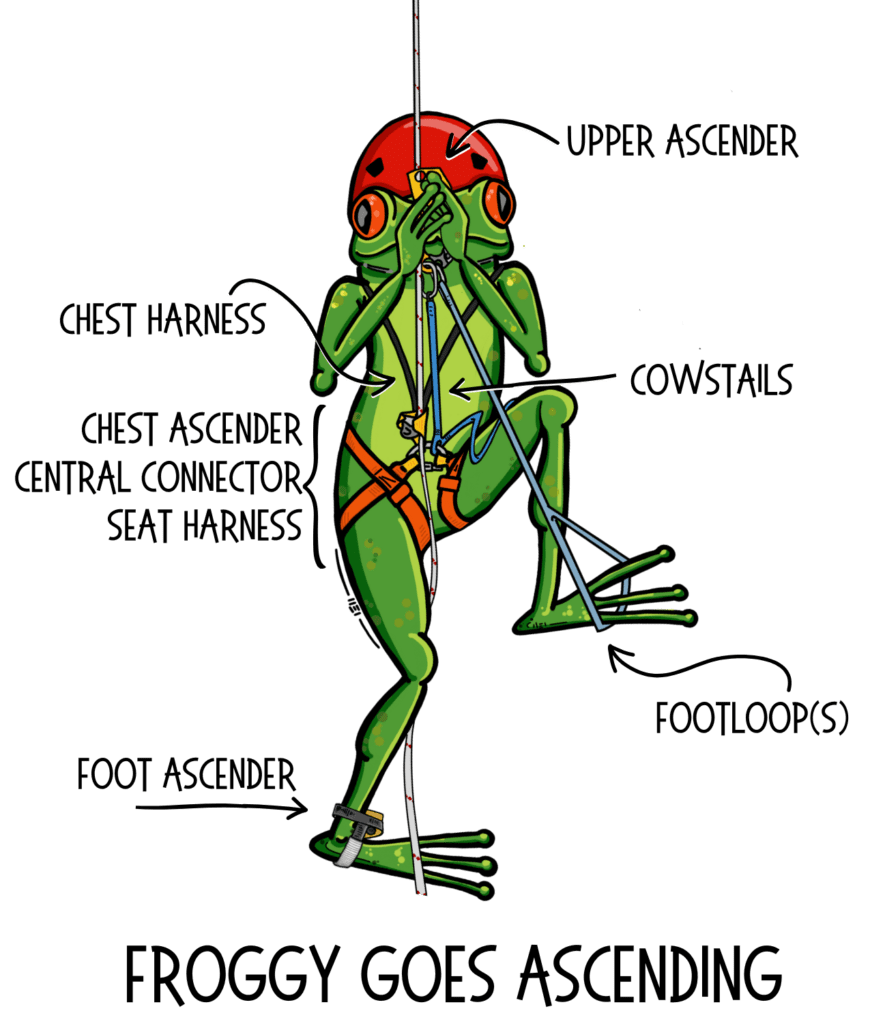
Seat Harness
A caving-style seat harness is the center of the Frog system. There are many options, but all feature a low main rigging point generally in line with (or just below) the top of the climber’s pelvic girdle. It should also allow an ascender to be attached typically with a quick link or specialized carabiner (see central connector below). This ascender is generally referenced as a “chest ascender” even though experience has proven that optimal placement is lower than the chest area. This low rigging point facilitates passing sharp or overhung edges both in ascent or descent, passing rebelays, inverting to access a patient from above, and a host of other rescue-oriented tasks.
Central Connector
The central connector (sometimes called harness connector or maillon rapide) holds the harness together. Options include a 10mm D-link (half-moon), 10mm delta link (triangle), and specialized carabiners such as the Petzl Omni Triact and Omni Lock. Many small party rescue techniques will require the central connector be capable of supporting a single-person load on its gate. All the connectors listed above meet this requirement. Do not use a standard carabiner as your central connector.
Chest Ascender (Croll)
The chest ascender is arguably the one piece of equipment that defines the Frog system. You can substitute other components reasonably well, but if you don’t have a chest ascender that lies flat against the body and freely runs up the rope then significantly more work will be required while ascending. The chest ascender must be easy to apply and remove from the rope, capture progress efficiently on ascent, and allow for efficient down-climbing.
Petzl was among the earliest to make a chest ascender and as a result their Croll design has become synonymous with the function. We’ll use the term “Croll” throughout this article in reference to chest ascenders.

Chest Harness
The chest harness is not a life-safety component of the Frog system, but is used to provide tension on the Croll to ensure ascending progress is captured. The chest harness provides limited upper body support while on rope and is essentially a tow strap for the Croll. A chest harness is most functional when it’s adjustable, snug fitting, and easy to don and take off. We don’t recommend the “bungee cord” option as it won’t provide the tension or support needed for some rescue maneuvers.
Bonus Tip #1 Ideally a chest harness has a short adjustable section that is quick and easy to operate without affecting the fit of the rest of the harness. This feature allows the climber to easily change the angle of the Croll and get closer to the rope when climbing. This is useful for both rescue maneuvers and general ascending when transitioning between vertical ropes and sloping pitches. This adjustability also comes in handy when crossing rebelays, mid-rope knots, or when a rescuer needs to leapfrog over an incapacitated caver on a single rope in a rescue situation. Popular chest harnesses that include this feature include the Adventure Verticale Speleoshoulder, the MTDE Garma, and Piri.
Bonus Tip #2 The strap connecting the chest harness to the Croll should enter the Croll from the front when threaded from the caver’s left so that it pins the Croll to the body and prevents it from twisting.
Cowstails (Lanyards)
Lanyards are an integral part of the Frog system that connect the wearer to an anchor or an ascender. Generally the Frog system uses two lanyards, one long and one short; referred to as “cowstails.” Some people add an additional, or third cowstail. However, with practice, all common SRT-based rescue techniques can be done with just two cowstails.
Commercially manufactured cowstails are available, or you can tie your own to fine tune the lengths. It is important that when tying your own cowstails, they are constructed of dynamic rope, not static rope or accessory cord. They need to dissipate energy during a fall while clipped to a rebelay or other static anchor point. The size is generally 9 to 11mm, as the cowstails may experience considerable abrasion while providing the strength to hold two people.
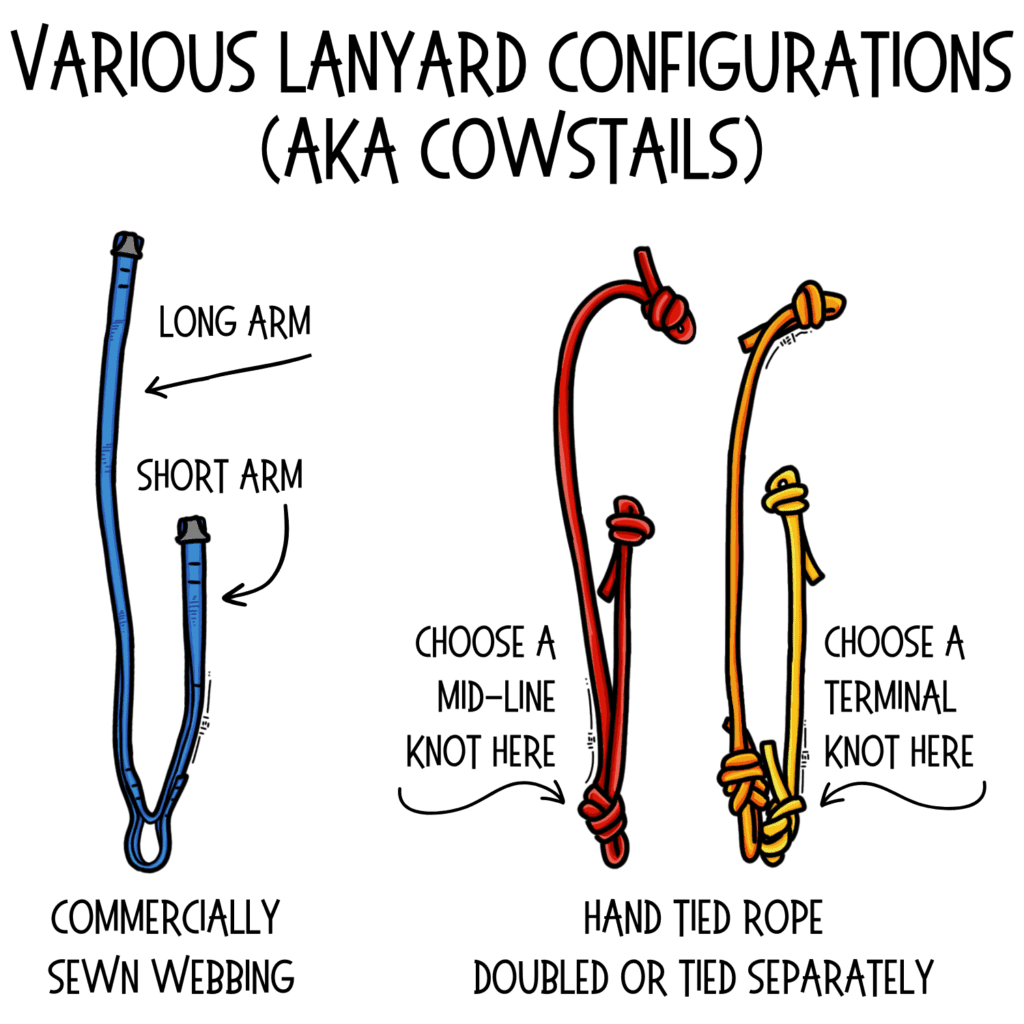
When choosing to tie your own cowstails, setting the length is important. Often the long arm is about 58 to 65 cm and the short arm about 28 to 35 cm but this may vary depending on your other gear choices.
The long cowstail is sized to allow the climber to operate the cam when hanging from the upper ascender, but not out of reach for the user. This length should be checked even when the user is tired or exhausted when posture is not optimal. The short cowstail should be as short as possible while being just long enough to reach past the upper ascender; or alternately the descender to clip into a rebelay.
A general rule of thumb is to tie each cowstail 3 to 5 cm too short and then load them. When the knots tighten, the cowstails lengthen to the right length. It may require fine tuning to get the loaded lengths perfect.
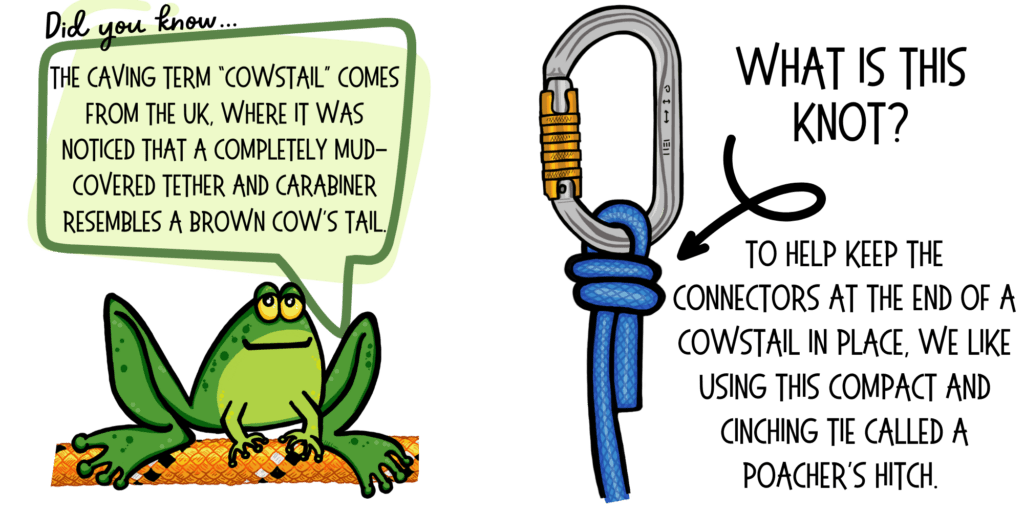
We recommend joining a cowstail to the terminal connector using a poacher’s hitch. It is a compact and cinching option but the tail ends of the hitch must be preloaded to ensure the hitch remains tied. Once the hitch is set it is secure. It is not a good option if you anticipate removing the carabiners with any frequency. Whatever knots you choose they will absorb some of the energy associated with a fall, allowing the cowstails to be slightly more “dynamic” than the stretch of the rope alone.
Bonus Tip #3: The carabiners you put on the end of the cowstails are especially important for rescue preparedness. Many cavers use non-lockers on the ends of their cowstails. This is fine for caving use, but in rescue cowstails often serve as patient connections. For that reason we recommend locking carabiners with either a gate that screws locked or auto-locks. Our favorite picks are carabiners with a key lock nose to minimize potential snag during use.
Upper Ascender
There are various options for the upper ascender in the Frog system. Handled ascenders are considered by many to be easier to operate with one hand. With experience you can get proficient with the non-handled versions and save yourself a bit of weight and bulk. We recommend one that has left-handed operation to allow for efficient down-climbing and to save time when doing a rappel test, especially if you are right-handed.
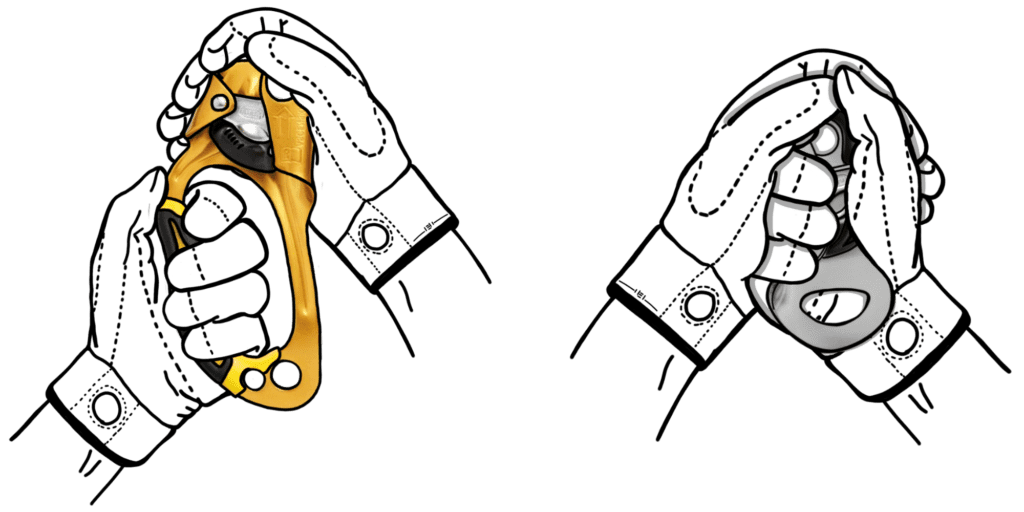
When grasping the ascender, it helps the climber’s posture and the function of the cam to cradle the camming area rather than solely using the handle. The climber can choose to use one or both hands regardless if a handle is present.
Bonus Tip #4: A great way to efficiently manage gear is to clip your upper ascender into the gear accessory carabiner on your harness through the top hole. Then clip your long cowstail into the bottom hole. This allows you to safely stow the ascender any time you need to use the long cowstail independently, such as for a pitch-head clip-in or when on a traverse line. Then, when you need the ascender, clip the cowstail into the bottom hole first before detaching the top hole from the gear carabiner. This method is clean and prevents dropping the upper ascender when not in use.
Footloop(s)
Of the many footloop options, we suggest one that is made from a very static cord such as tech-cord or Dyneema. Avoid nylon webbing, accessory cord, and materials that stretch because some upward progress is lost with each step. Whether you choose a single or double footloop we recommend connecting your footloop into the carabiner of your long cowstail using a non-locking carabiner (yes, it is possible to have a non-locking carabiner in a rescue Frog system!) This allows you to quickly move the footloop(s) to another position for better maneuverability.
Footloops can be fixed length or adjustable. Once you get your length correct, adjustments are minimal for most applications. Adjustable footloops are helpful should you need to hand your footloop to someone else or when teaching new cavers ropework.

Many European cavers are in the habit of strapping the footloop to the foot or ankle for the entire vertical portion of a cave trip. The Petzl Footcord incorporates this feature, or another footloop can be secured using something elastic such as a section of inner tube, a large rubber band, or an adjustable strap, or bungee. As long as it securely holds the footloop to the foot it will work. The advantage is that you never have to work or kick your foot into or out of the footloop. Engaging and disengaging the footloop is done instead by attaching or detaching the footloop carabiner from the upper ascender.
Bonus Tip #5: Need help when carrying heavy weight such as a big pack or a person? There are a couple of rescue techniques that use a Minima Azione Operative (Minimum Operational Action or MAO for short) system, which converts your ascending system into a 2:1 haul system. Using this system results in shorter progress with each step, but also reduces the perceived weight. Having an adjustable footloop allows you to convert your climbing system to a more efficient MAO system.
Foot Ascender
A specialized foot ascender, such as the Petzl Pantin, may be considered optional to some, but it is ideal when optimizing your Frog system. We recommend that you give it a try if you don’t already have it as part of your system. A foot ascender can assist the climber to stay closer to the rope and have better climbing technique. Our observation is that cavers who are practiced with them find them invaluable. Since there is no safety catch, a foot ascender can quickly be attached and detached from the rope. This can allow a caver to essentially convert their Frog system to a rope walker style system for greater speed on ascent. A foot ascender allows for greater variability in climbing style, solves the problem of the Croll not feeding when close to the ground, and generally makes the entire system more efficient in its function. Another advantage for small-party rescue maneuvers is that it provides one more way to easily step up a foot or two when needed to off-weight another piece of gear.

Rappel Device/ Descent Control Device (DCD)
Choosing a rappel device is as personal as the lily pad you call home. We won’t tell you which one to use, but whatever your DCD choice, it should provide variable friction control, function in the cave environment, and be capable of handling a two-person load. The two most common rappel devices used in caving are a bobbin with a friction carabiner, and a microrack with a hyperbar. For the purpose of optimizing your Frog system we will focus on these two devices since they are similar in size and the most popular. System adjustments revolve around the size of your gear components. Therefore, using a different DCD may result in altered Frog system adjustments.
Gear Arrangement in the Central Connector
How you arrange your gear, particularly related to the Croll, can mean the difference between getting stranded in a J-hang or moving through it smoothly. This particular topic can create a lot of passionate discussions among avid Frog system users. We want to offer our perspectives on ways to optimize your system for maneuverability in ascending and rescue situations.
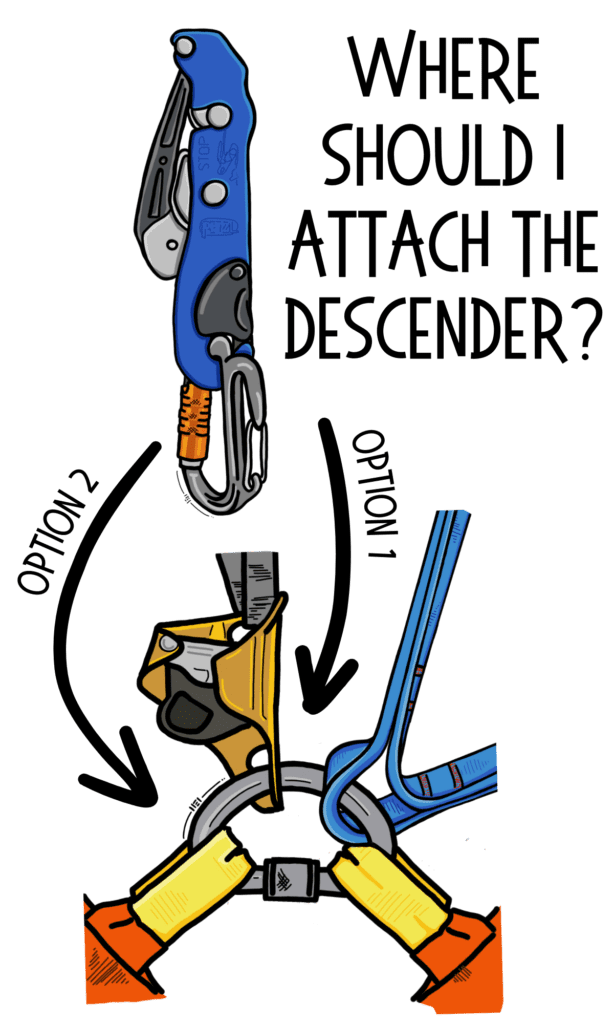
First, we recommend attaching the cowstails directly into the central connector climber’s-left of Croll (the flat side). Second, we recommend also attaching the descender climber’s-left of the Croll. Reference the image, “Where should I attach the descender?” for a visualization of two different options. Both option 1 and option 2 descender attachments are acceptable, but for the rescue mindset, we prefer option 1.
Our perspective on the optimal placement of the descender takes into consideration the type of descender and the attachment method of the descender. For bobbins, a carabiner is required to fill the hole and prevent side plate opening. For a microrack, many users choose a 7mm-long oval screw link when attaching their descender to prevent the possibility of dynamic rollout. For one device, the attachment is moveable at any time and for the other it is fixed in place for the duration of the trip. Since there are a variety of maneuvers that require weighting and unweighting the Croll and descender, the difference in descender placement, and the ability to change that placement, can result in varied outcomes for the climber.
Let’s consider the scenario of a caver making a rope-to-rope transfer. Often when making a transition from one rope to another, the descender begins to share the load with the Croll. When the descender is attached climber’s-right of the Croll (option 2) then the descender can pinch against the Croll’s release or even wedge into the teeth area of the Croll. The descender can prevent the user from being able to open the Croll safety catch and cam, and create a jammed mess that is extremely difficult to remedy.
Choosing to place the descender climber’s-left of the Croll (option 1) avoids any potential issues, allows for clear access to the safety catch, and also protects the Croll from potential damage. Because of these issues, we recommend that users place their descender climber’s-left of the Croll (option 1).
Many rescuers choose to attach their descender climber’s-left of the Croll (option 1) as a general habit, no matter their choice of rappel device or descender attachment method. This placement may require you to re-think which side you store your unused gear, re-configure footloop/foot ascender arrangements, or create new habits. Storing the cowstails, upper ascender, and descent control device on your left side keeps gear tidy and low profile. If this is new to you, we recommend trying this out; it may not be as big of a hurdle or mindset change as you imagine.
Gear Arrangement and the Foot Ascender- The foot ascender for a Frog system is now available in both right-foot and left-foot versions. This creates the question, “Which is better for me?” Is choosing right versus left determined by the user’s strongest leg? Not always, and instead we’ve observed the optimal choice is determined by the user’s other gear configurations.
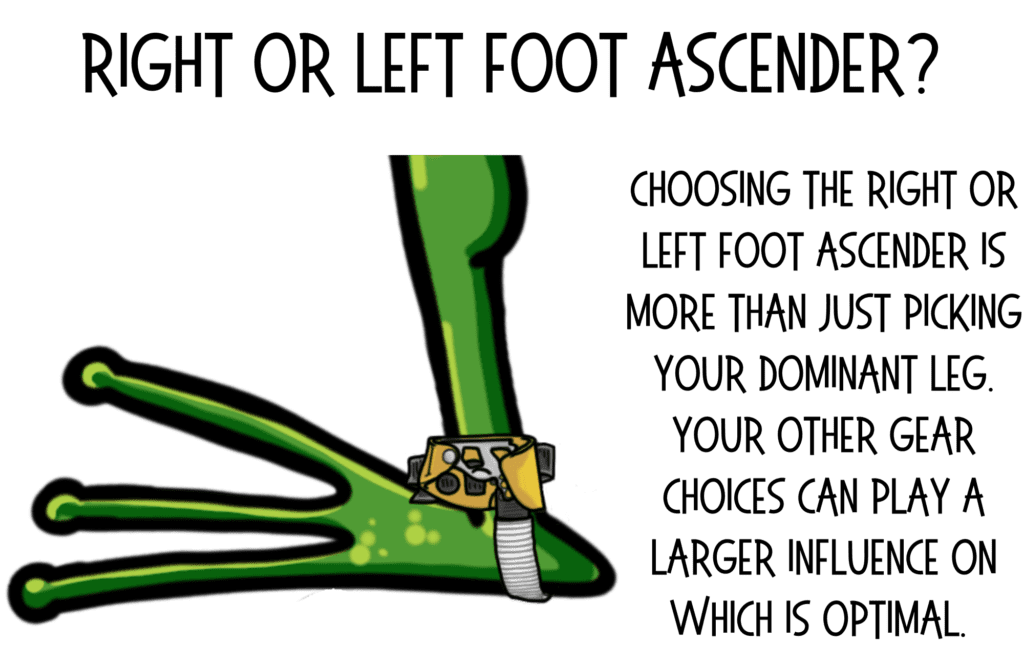
Envision how the gear attaches to the rope and how you are attached to that gear. Avoid having any gear wrap to the left, right, or around the path of the rope. The rope is going to remain in a straight line as much as possible while ascending, and you want to reduce the chance of twisting or entanglements.
If you configure your Frog system as we have suggested so far, then the upper ascender, cowstails, and footloop(s) are on the left side of the rope’s path. The Croll is furthest right in the central connector, and therefore the straightest path for the rope to a foot ascender is to the climber’s right foot. The gear does not cross the rope path and remains in order. Should you choose to switch sides for the footloop and foot ascender, then gear and rope will entangle on some maneuvers, usually requiring the foot loop to be unclipped and then unwrapped and re-clipped
Bonus Tip #6: If you experience tangled gear while moving through rebelays, consider the following adjustments: If you regularly need to remove your footloops to untangle them from a rope, consider switching sides for your footloop and/or foot ascender. If you regularly need to remove your upper ascender because the cowstail is frequently wrapped around the rope, consider where it is connected in your central connector in relation to the Croll.
Pack Tether
As responsible cavers we need something to carry the extra needed for safe caving practices. A common practice we see is someone wearing a pack on their back or hooked to a gear loop while ascending. This can alter your center of gravity and lead to poor ascending posture or being more tired during the climb. This is especially noticeable when the pack is heavy.
Instead, we suggest that you use webbing or cordage to tether your pack that is separate from your ascending system. Avoid using your short cowstail to connect to your pack as you might need that to perform a rescue maneuver or get out of a jam. We suggest connecting the pack tether through your leg loops, to the back of the waist strap, or to the bottom of the central connector. Most experienced cavers prefer the tether to be long enough for the pack to hang just below their feet, so it won’t interfere with their ascending motion, but can still be easily manipulated around obstacles.
Additional Gear
Besides the equipment mentioned above, what else should you carry with your SRT kit to be prepared in case something unexpected happens? No reason for the “rescue-frog” in the party to carry all the additional gear. If everyone caving carries a couple extra pieces of gear there will be enough to make multiple rescue systems. This is especially true when the extra gear performs different functions (e.g., pulley, connector, rope grab). By emphasizing minimalism and equipment compatibility we can move faster through the cave while still ensuring that we have full capabilities to build an awe-inspiring rescue system.
When considering what to bring, think of what rescue techniques you and your group know how to perform, and ensure you have the extra equipment to build those systems. Some common “extra” items include:
- Two to four carabiners (preferably oval or HMS), not anticipated to be used in rigging
- A small steel or HMS carabiner for Münter Hitch operations
- A micro pulley or two (regular or progress capturing – e.g. ROLLNLOCK or Micro Traxion or Mini PMP)
- A couple of 7 or 8mm prusiks or slings in varying lengths
- 10 to 40 feet of webbing or cord
Together, these components can be used to build anchors, haul systems, traveling hauls, lowering systems, and more. There is no one right answer and equipment should change based on the cave environment and knowledge of personnel in attendance.
You’ll find many variations and preferences among rescuers. What is important is that among the group there are enough rope grabs, pulleys, and carabiners or screw links to build rescue systems.

Bonus Tip # 7: When extra gear comes from multiple people it is useful to make sure that all the gear works well with each other. For example, common problems are that one person’s pulley does not work with the prusik cord from another person because the cord is small and can get sucked into the pulley. A way to ensure compatibility of gear is to learn how to build rescue systems. Practice building systems with your caving buddies using the combined gear each caver regularly carries.
Final Thoughts
Having the right gear is important, but it’s equally important that you optimize your ascending system and know it well. Practice under a range of conditions and scenarios. Remain open minded and try some advice from experienced cavers. You’re never too old to learn new tricks or revisit your techniques. Imagine being able to make some minor adjustments to find they help you increase efficiency, save effort, and increase endurance. You may find that the more you build and refine your single rope technique skills, the less gear you’ll need.
Additionally, we encourage you to go beyond just knowing your system —also learn your teammates’ systems. This will enhance your ability to perform a rescue using both your and your companions’ gear. If you are caving with buddies who have different rappel devices, you need to know how to use, and tie off, both your device and their device(s). Your lives may depend on it! Practice in a controlled and safe environment before an incident occurs. Preparedness is key.
About the Authors- John Punches, Gretchen Baker, Andy Armstrong, Scott McCrea, Tom Evans, and Mel Eady-Pumplin (editor and illustrator)
Each contributor to this article has been involved with developing the National Cave Rescue Commission (NCRC) small party assisted rescue (SPAR) class. Collectively we have more than 105 years teaching cave rescue as volunteers. Caving is important to each of us, but not at the risk of safety and conservation. We urge you to continue your quest for education in safe and responsible caving practices.